The Half-Million Dollar Darkroom

by Joseph T Sinclair

Photography has two hemispheres: the shooting of a photo with a camera and the manipulating of the image into its final form. If the photographer is a commercial photographer, the purpose of postprocessing is to fine-tune the photo to a commercial standard. If the photographer is a fine art photographer, the purpose of postprocessing is, well, almost anything that suits the aesthetic whims of the artist. The point is that postprocessing is an integral part of photography.

It used to be that photographers were crippled. That is, they couldn’t or didn’t do thoroughgoing postprocessing. Some photographers had an impoverished darkroom in their closet, a half measure. Others had a studio darkroom that provided a broader range of image manipulation but not the robust facility of a commercial photo lab. Many photographers left postprocessing to photo labs, and the best labs were ones that did the best job of catering to the whims of good photographers. But catering and doing it oneself are decidedly different activities. And the chemical process itself is severely limited not only in scope but by the huge amount of time and expense involved. Consequently, postprocessing in the film days was despair for most and at best an arduous opportunity for just a few.

Although that was true for black and white, it was also typical of color postprocessing but more so. More variables, more chemicals, more equipment, more technology, more of everything. It was, indeed, overwhelming. It was a hemisphere seldom emancipated from its severe chemical limitations.

Adobe Photoshop is the half-million-dollar darkroom we never had. But it’s more. It’s a darkroom unchained from the limitations of the film era. The good news is that it’s dirt cheap, much faster, much more convenient, and with a robust capability unimagined before the digital age. The dark side is that it has a steep and inconvenient learning curve. It’s not for the lazy. It’s for the complete photographer.

pjotoshop-1

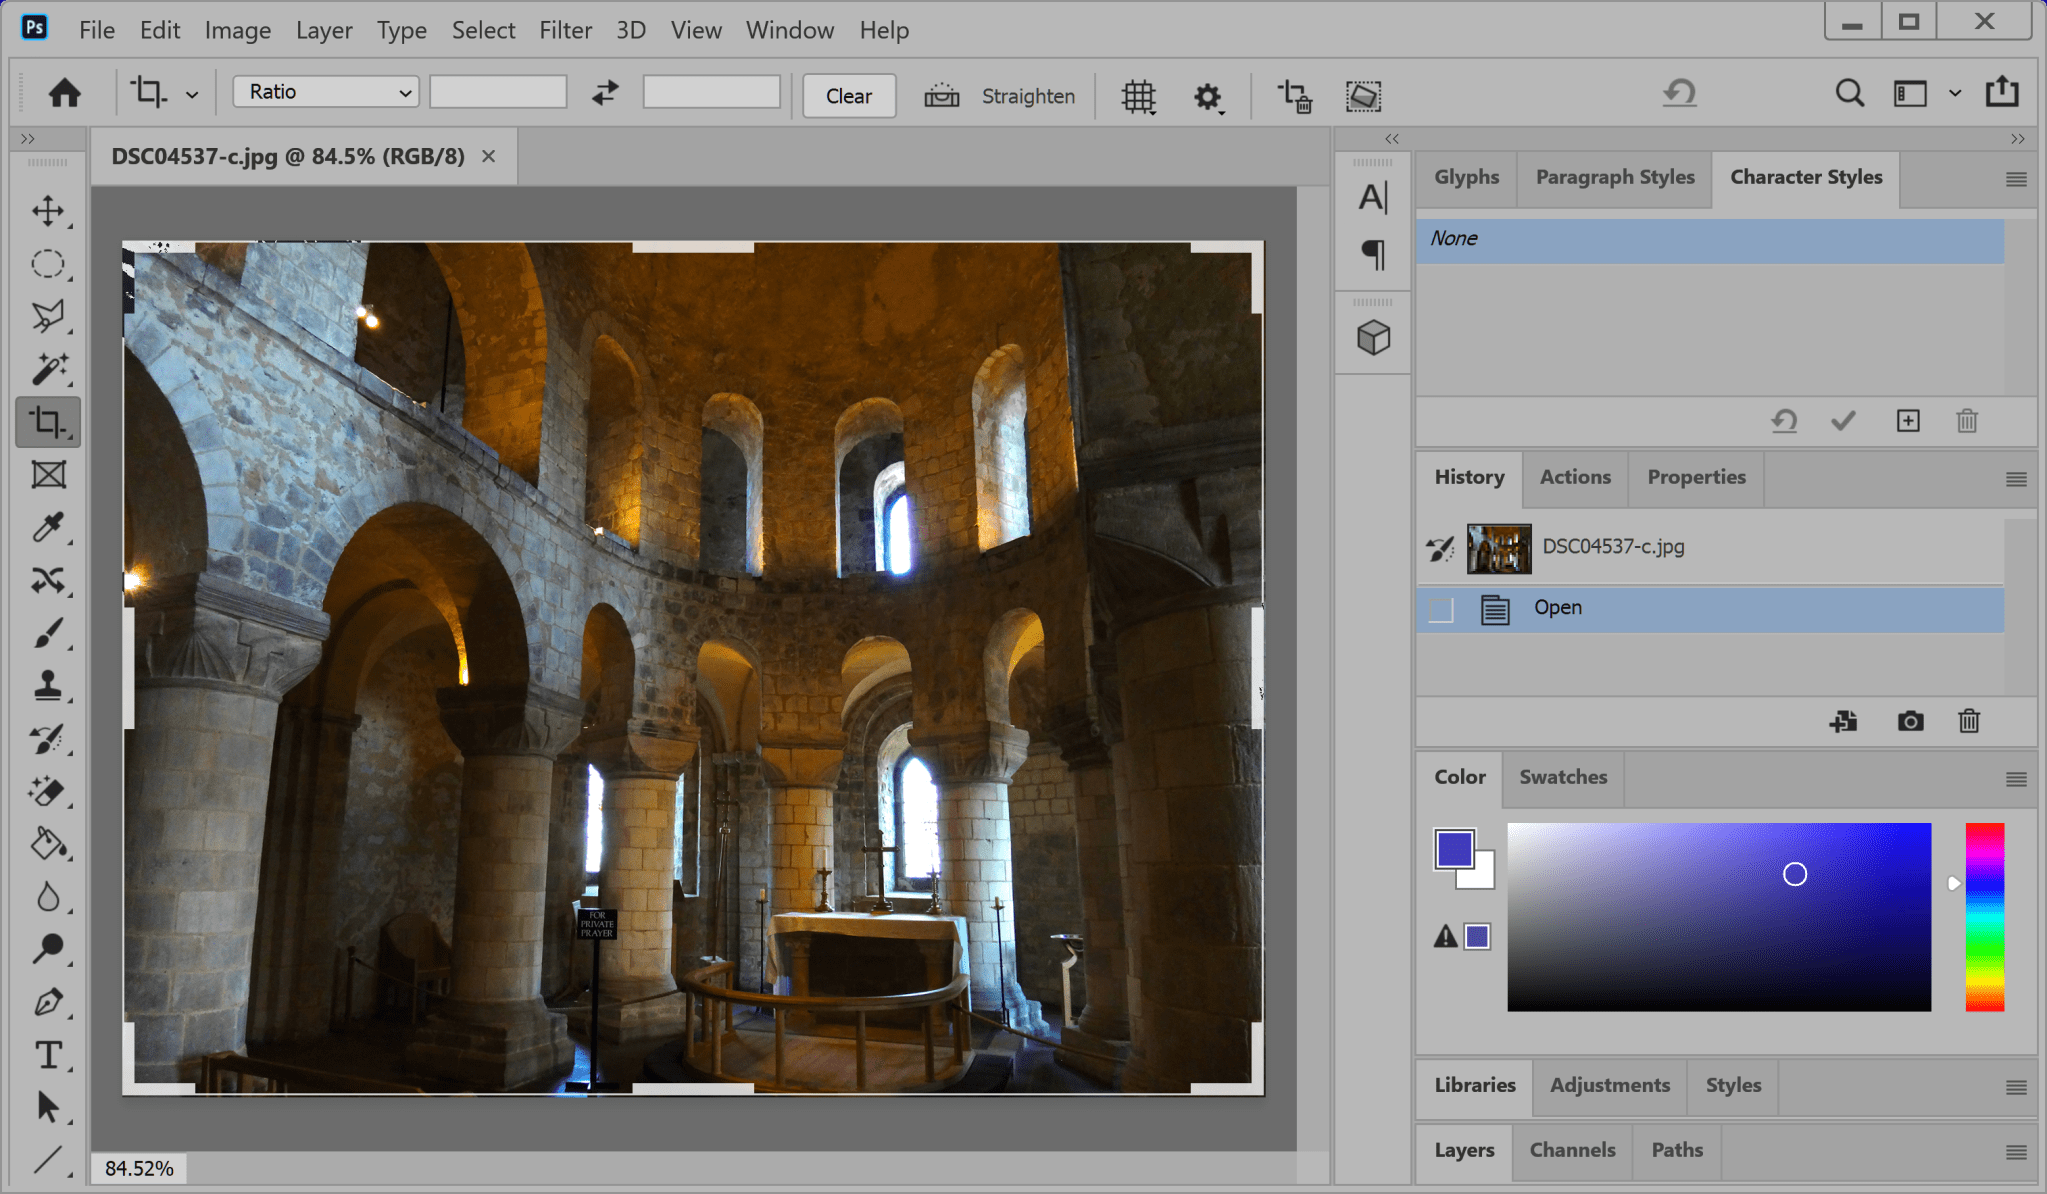
By “Photoshop,” I mean any one of the categories of full-bodied photo processing software now available to everyone, such as Lightroom, Corel, DxO, Phase One, etc. And, of course, Photoshop itself. No messy, expensive, lung-mauling, eye-maiming chemicals. Instead, instant results all in the space of a computer, anywhere. It’s hard to imagine going from such an archaically inconvenient system to such an insanely convenient one. But it has happened. Isn’t it bizarre that photographers bitch and moan about paying $9/month for Photoshop when their film/processing/chemical expenses per month during the film era might have been ten or fifty or a hundred times as much.

Ah, but it’s the learning curve. Photoshop is too difficult to learn. One doesn’t need all that capability. One can get by with Microsoft Paint, which is free. Swinewash! In one Photoshop community college course, you can learn to do more postprocessing than Ansel Adams ever dreamed. And why wouldn’t you?

Of course, there’s nothing wrong with getting the best possible photo you can in the first place. We spent hundreds or even thousands on equipment to do so. And postprocessing can’t turn a lousy photo into an acceptable one. But there are so many ways to take a photo inadvertently imperfect, even if slightly so, that postprocessing is valuable for almost every shot you’ll ever take. And for many shots, it’s the difference between life and death (of the photograph, not the photographer). Thus, in the digital age, Photoshop has become essential to be a proficient postprocessor. No excuses. No half-baked software. No shirking widely available training. It’s what you do as a photographer.

The difference between the very good and excellence in almost every human activity is marginal. That is, it’s the result of the little extra bit of talent and hard work that goes into the completion of a project or activity. For photographers, this means that knowing and using first-rate software for postprocessing is the edge that generates excellence. That assumes, of course, that one has done an excellent job of shooting the photos in the first place. But it’s hard to imagine an excellent photographer today who’s not an expert in using Photoshop. It’s inexpensive, and the training is no more demanding than a trade school or college course (for a solid postprocessing foundation).

For commercial photographers, it’s a path to excellence. For fine art photographers, it’s a creativity bonanza. For those photographers who abstain, it means being forever stuck in the yesterday of the photographic craft unable to handle fresh possibilities.

But what about amateurs (enthusiasts), some of whom are more competent than career photographers? If amateurs do anything besides take snapshots, they invariably follow a commercial model or a fine art model in their photographic activities. Consequently, they are in the same boat as commercial and fine art photographers. They need to do their own postprocessing and use full-bodied photo editing software (e.g., Photoshop).

To reach your full potential as a photographer, you need to do your own postprocessing and do it in the most competent manner possible. The half-million-dollar darkroom is with us for the foreseeable future, and the savvy photographer will embrace it.

Spring Photography

The beautiful spring came; and when Nature resumes her loveliness, the human soul is apt to revive also. –Harriet Ann Jacobs

I was surprised to note that the vernal equinox, the official start of spring in the northern hemisphere, comes on March 19 this year (In the USA). That’s early. Typically the first day of spring is the 20th or 21st of March. Indeed, according to The Old Farmer’s Almanac, this is the earliest spring equinox since 1896!  It turns out that this is due to quirks in our calendar system related to leap year (and leap century). And as a result of these quirks, spring will begin on March 19 every leap year this century. 

Given how early the vernal equinox is this year, perhaps I should not have been surprised (but was, at least a little) to have 7 inches of new snow on the first day of spring. That’s the heaviest single snow fall we’ve had, at our house, during this somewhat dry winter! It was just a little reminder that here in the Rocky Mountains,  spring doesn’t always pay strict attention to the calendar. Still, this is a good time for a post about spring photography. 

Although we have many great opportunities for landscape and nature photography in the winter here in the southern Rockies, there is no question that the new life associated with Spring makes it a joy to photograph this time of year. The grass is green, one of the most evocative colors for humans. Birds and mammals are migrating. Flowers are beginning to bloom. And, given our altered way of life in the era of COVID-19, it is fortunate that there is still a lot of photography that we can do locally, often in our own backyards, this time of year

In a recent video, Photo Tom explores 9 tips and ideas for spring landscape photography. It’s worth watching to revisit some ideas for the season. One that I think is big, is to look for the transition time between seasons. The snow this week may present opportunities for photographing the contrast of flowers, for example, in snow. Other ideas include taking advantage of the bright green of spring foliage, weather patterns, and foggy mornings. Check the forecasts for the day after storms move through. Cool mornings after a storm will likely produce fog in the valleys, especially around our hot springs. Fog creates opportunities for interesting, moody photos. If you are on a ridge above valley fog, you may have a dramatic sunrise. Later in spring, as the snow melts from the high country, waterfalls and streams will be flowing strongly, making for excellent photographic opportunities. For more ideas about spring subjects, as well as composition and lighting tips to take advantage of them, check out this post by Larry Price.

Of course, one of the highlights of spring are the blooming flowers.  Anne Belmont is a creative flower photographer, and shares a number of good ideas for unique, artistic flower photos in a two part series. These articles are full of ideas, including  seeing flowers uniquely, and suggestions for creative aperture and composition  When thinking about flowers, as well as other spring subjects such as butterflies, you’ll want to think Macro. Macro photography is easily done in your own back yard (or even inside) and can be very rewarding in terms of training your eye to see textures and patterns Lee Hoy has some good suggestions for getting started .  

There are plenty of subjects worthy of a photographer’s attention in the spring. So take advantage of the season to practice your photography, but be safe about it!

Print Sharpness

It’s difficult to discuss sharpness without making some assumptions. The photograph itself has to be sharp. That means a good camera and lens, correct focus, steady platform, etc. This discussion assumes that you start with a sharp photograph. And then you print.

As an example, let’s use the Sony A7 II, a 24MP (megapixel) camera, which has a frame of 6000 x 4000 pixels.

Commercial printing (e.g. magazines) is done at 240 dpi. Fine art printing is done at 300 dpi. (Most people can’t see much more than 300 dpi.) At 240 dpi the Sony 24MP camera generates a physical print 25 x 16.7 inches. At 300 dpi the print is 20 x 13.3 inches. (length in pixels ÷ dpi). When you consider viewing distance, however, the further you get away from a photograph, the less dpi you need to create the same illusion of sharpness.

The distance/sharpness is difficult to calculate due to so many variables. But the chart at this website gives you something to go by:

http://resources.printhandbook.com/pages/viewing-distance-dpi.php.

It indicates that at a 24-inch viewing distance, you need 300 dpi to get the maximum sharpness. Yet at a 40-inch distance, you need only 180 dpi to get the maximum sharpness. Think of 24 inches as being about the distance you view a photography book or look at a computer monitor. Think of 40 inches as being about the typical distance you look at a photograph hanging on the wall in a museum, gallery, office, or home.

Using the 40-inch viewing distance, you can generate a 33.3 x 22.2 inch print of a 6000 x 4000 pixel photograph at 180 dpi, and it will look as sharp as can be. But if someone sticks their nose into it (gets closer than 40 inches), it will not look its maximum sharpness.

Another means of determining distance/sharpness is to calculate the maximum viewing distance according to the diagonal measurement of the printed photograph. Some experts say the viewing distance should be 2x, some 1.5x, and some 1x (of the diagonal).

Calculate the diagonal with the formula: c = √(a2 + b2) where a and b are the frame dimensions and c is the frame diagonal. Thus, for a 20 x 13.3 inch print, the diagonal is 24 inches. At the conservative 1x, the viewing distance is 24 inches for maximum sharpness (300 dpi). At 1.5x, the viewing distance is 36 inches. And at 2x the viewing distance is 48 inches. Thus, for these last two distances, you would need only a dpi well under 300 to provide maximum sharpness for viewers.

It’s all very subjective. But one thing is certain. The first consideration of sharpness is how the viewer will see the print. And distance matters.

The next consideration is whether you can improve the sharping because it’s a digital photograph and not a film photograph? For many digital photographs the answer is a modest yes. For some photographs the answer is an absolute yes. Sharping digital photographs is beyond the scope of this article and is also subjective. But you may be able to enlarge a photograph 10%, 20%, or 30% and still retain its inherent sharpness by applying sharping in postprocessing. (However, you can’t take an unsharp photograph and make it sharp with postprocessing.) In other words, just by sharping in postprocessing, you may be able to enlarge a photograph a little without the loss of sharpness.

Another consideration is general enlarging. How much can you enlarge a photograph without noticeably losing sharpness? One of the original guidelines was that you could enlarge about 30% by doing 10% at a time, without noticeably losing sharpness. Today the algorithms are better, but the experts’ opinions are subjective. Some say 50% enlargement. Some as high as 400%. But this is something that depends on the characteristics of the photograph, your enlarging experimentation, and the software you use. You might want to do your experimenting with a small portion of your photograph first before committing to printing the whole enlargement.

You will want to remember that enlarging 2x does not double the frame dimensions. It doubles the area of the photograph. If you double the frame dimensions, you enlarge the area 4x.

Finally, consider the medium. Metal prints can be printed at 300 dpi, although 240 dpi is a typical default for metal printing services. The dpi of inkjet printers is virtually impossible to calculate without a lot of specifications you probably can’t easily get. The dpi for inkjet and laser printers is based on advertising, not on the traditional printing dpi. In other words, a 1200-dpi inkjet printer may print only at 280 dpi according to traditional printing specifications. If you buy a printer, you may want to ascertain the actual traditional print specification first, if available. Likewise, if a photographic service provider uses an ink et printer, you will want to likewise ascertain the actual traditional print specifications.

A word of warning. You can order a 12000 x 8000 print of your 6000 x 4000 pixel photograph, and no one at a photographic service will give it a second thought. They will simply automatically enlarge it 4x as part of their processing. Although they usually have good enlarging software, it raises the question of whether you would rather enlarge it yourself knowing that your photograph will otherwise be automatically enlarged. In other words, just because you can order something, doesn’t mean that it will retain its sharpness to the degree you require for your viewers. You may want to have more control.

What’s my practice? I don’t enlarge anything and don’t worry about sharpness. With my 25 MP camera, this is a practical point of view. Nonetheless, there are always those situations where I need a large print, and enlargement is required. In such cases (rare for me because I print few photographs), I decide how to enlarge based on the factors outlined in this article; that is, I handle each photograph on a custom basis. But if you find yourself enlarging your photographs all the time, you may want to get a camera with more MPs thus enabling you to forgo enlarging so much of the time. The new Sony A7R IV has 61 MPs (35mm type camera) with a 9504 x 6336 pixel frame, and its brand competitors are comparable.

Finally, if you typically crop much of a digital photograph away, you may have a need to enlarge what you have left. In that case, a camera with plenty of MPs is doubly useful to your photography efforts.

Cropping

by Joseph T Sinclair

This is a simple postprocessing technique but requires an in-depth look as to how it can fit into your photography. I will use Sony cameras as examples, but of course other camera systems are similar. And the focus of this discussion will be on resolution (inherent in 35mm film), which is one of the most important characteristics of good photography except in cases when you forego the sharpness of high resolution for other photographic effects.

Most experts tell us that a 10-12 MP (megapixel) camera is the equivalent for resolution of a 35mm film camera. Indeed, Sony’s original top-of-the-line fast-action camera (A7S – made to maximize multiple frame shooting rather than large frame size) had only 12 MP and cost 20% more than Sony’s then current top-of-the-line general purpose camera (A7R) with 36 MP. With a 36MP camera you can get about three times the area of a film-equivalent photograph and still have the resolution of 35mm film for each third. That means you can crop 67% away and still have a full size 35mm-film equivalent photograph (and 35mm-film sharpness). In other words, the more MPs the merrier. MPs matter for cropping.

For starters, let’s dispose of the Haiku philosophy of photographic art. It goes something like this. Photographs must be traditional rectangles (with unequal adjacent sides and a limited selection of aspect ratios) so as to impose the proper aesthetic discipline for creating fine art. That’s like saying a poem must be a Haiku poem in order to be considered fine art. A Haiku poem has three sentences with 5 syllables, 7 syllables, and 5 syllables respectively. And it’s a traditional form. But I don’t think Haiku defines poetry. And likewise, traditional rectangles (frames) don’t define fine art photography.

Indeed, cropping is the new aesthetic freedom. Cropping used to be done in the darkroom, which made it somewhat limited and generally unavailable to most photographers. Now it’s done in digital postprocessing and is quite easy for anyone to do. Even fun. Beyond just cropping and adjusting the sides of a rectangle, one can even create a photograph of any shape in postprocessing using various software techniques.

What are the considerations for cropping?

  • You don’t have to be so careful framing your photos. In fact, if you overshoot a photograph (take a photograph larger than the frame you seek), you can easily crop it to your specifications more precisely in postprocessing.
  • If hurried, you can simply point and shoot; and crop later.
  • If something is in the photo you don’t want, you may be able to crop it out.
  • Upon review, you may find a photograph within the photograph that you find more aesthetically appealing than the overall. You can crop it out.

DSC09458-c-full

DSC09458-c

  • You can create various shapes of photographs in postprocessing, such as circles, ovals, triangles, and custom forms.
  • If you crop to an odd shape, you can have a metal print service provider cut the print into the shape (e.g., MagnaChrome, Concord, California has a computer-guided metal cutter that can do so).
  • With enough MPs, you can crop away a substantial portion of a photograph and still have enough left for a resulting sharp film-equivalent photograph.
  • You can crop away the upper third and the lower third of a one wide-angle landscape photograph to make a panorama.

DSC00689-c

DSC00689-c-crop2

  • You can make different versions of the same photograph (different crops).
  • You can set a crop to a certain preset aspect ratio and print a photo that will fit into a certain size off-the-shelf (prebuilt) frame.
  • You can set a crop to a certain preset aspect ratio and create a photo that will fit snuggly into a photo collage.
  • You can use any lens as a non-optical telephoto lens by cropping away all but the small portion of a photo.
  • You can often crop to correct mistakes that you make. There are so many ways to make mistakes, even for the best photographers, that cropping capability becomes quite valuable.

How about a practical example. Sony now has a 61 MP 35mm-type camera (A7R IV). Is that too many MPs for ordinary use? No. How about using this Sony camera with a super sharp 50mm lens (e.g., Sony-Zeiss 55mm f1.8). Do you also need a telephoto lens? Or can you crop out a one-sixth portion of a 50mm-lens digital photograph and use it as a film-equivalent photograph? Something to think about.

Digital cropping brings a bonanza of new techniques to use to create all sorts of appealing photographs and to help define new opportunities in photography. That’s why MPs are important. The more MPs your camera sensor has, the more flexibility you have for cropping.

irr-crop-2-c

Shooting Horses

by Joseph T Sinclair

by Joseph T. Sinclair

I had occasion recently to visit a small ranch to shoot horses, and I learned some valuable lessons that I will pass on to you.

First, if your camera has a shutter click, you will need to wrap your camera in a beach towel or something comparable to muffle the click. You don’t want to spook the horses.

DSC08856-b
© Joe Sinclair

Second, horses respond very well to common courtesy.  You’ll need to bring some sugar. Two pounds per horse is about right.

DSC08834-b
© Joe Sinclair

Third, don’t let the horse flies bother you. Yes, there a lot of them, and yes, they have a nasty bite. But remember, you’re a professional and must remain concentrated on the shoot.

Fourth, wear shoes that you want to throw away. Otherwise you will have an unpleasant cleaning job when you get home.

Fifth, if you get suckered into riding a horse, make sure you have plenty of Eczema Honey Healing Cream at home to rehabilitate your backside.

Sixth, if you ride a horse, be sure to mount it on the left side. If you mount on the right side, everyone will know you’re a dude, and PETA may single you out for horse harassment.

DSC08917-b
Let’s make the ride short, pal. I have some grazing to do.

Seventh, take a telephoto lens in case you happen to spot a barn rat. Barn rats make a unique photo-op that you don’t want to miss.

Finally, never walk in back of a horse. Horses are related to donkeys. If you’re a Republican and the horse knows it, the horse may kick you across the barn. Your camera would be OK because it’s wrapped in a towel, but the kick may knock some sense into you.

Good luck with your shooting.

DSC08894-q
THE END


May Photo Talk & Coffee

coffee and cameraJoin us at 9 AM, Thursday, May 24 for coffee (or breakfast) at Cafe Colorado for our (almost) monthly Photo Talk & Coffee.

Bring some photos to share & discuss, either digital or prints. We will talk about photography, summer outings, and other topics, as determined by the group. Also, please bring your signed waiver for the Cumbres & Toltec outing on May 25 (or return by email earlier).

Cafe Colorado is at 565 Village Dr, just off Highway 160 west of Piñon Lake and east of McDonalds.